Design Elements


Restoring the Art of Liturgical Needlecrafts
Apostolate of the Canons regular of St. John Cantius
Purificators
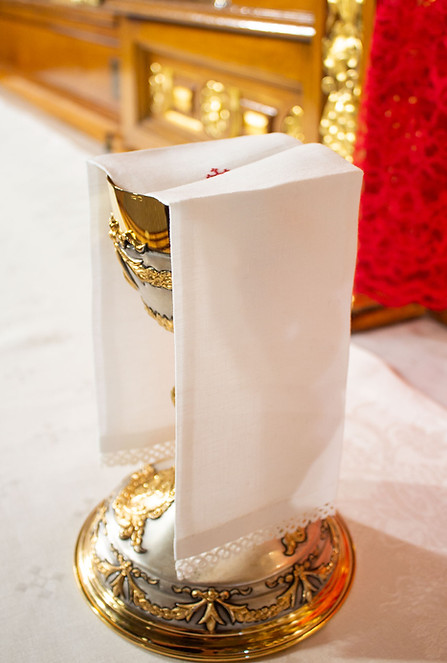
When we officially began the St. Martha’s Guild Fr. P. wisely suggested that we start by making purificators. It was a perfect first project. There is something extraordinarily lovely about making these and Fr. knew it would teach us a lot. This undertaking introduced us to linen, simple lace making, precise measuring, cutting and stitching and the most basic embroidery.
You can buy a twelve pack of purificators on Amazon for about $7 each. They’re machine sewn with crooked seams and an uneven zigzag red cross located kind of in the middle. They’re made of some kind of thin fabric of unknown content that isn’t absorbent. They’re not very straight so it’s a challenge to get them folded properly for Mass. They’re made somewhere by people who probably aren’t Catholic and probably don’t know what a purificator is. They are cranked out with a distressing focus on speed (“Could you not sew with me for just one hour?”). A purificator is one of the most valuable pieces of fabric on earth because it is used in the Mass and makes physical contact with Our Lord.
Because of that, we set out on a quest to create the most sublime purificator possible. It would be made of the finest linen. It would have mitered corners so there wouldn’t be extra bulk to scorch under the iron. It would have an interesting and tasteful (and straight) cross in the exact center. It would have narrow hems on the sides and deeper ones on the ends. It would have a beautiful, hand made, tatted lace edging on the ends. It would be carefully stitched by hand. We would do all of this peacefully, patiently, carefully and reverently knowing the end purpose for this purificator we were creating. And we would let purificators change us.

Well, actually that last bit came as a surprise. We fell in love with this small, simple act of service. We basked in the still, quiet beauty of crafting something like this.
We also got frustrated as all get out. There’s definitely a learning curve to this work. We discussed the great value of being taken down a notch or two by a rectangle of fabric. We felt like 7-year-old Victorian children, sternly directed to remove those pathetic stitches and begin again. We looked in horror at the crazy tatting videos on Youtube and churned out a lot of unhappy knots. That, however, just made it all the more satisfying when the purificator was completed properly.
So, here are the particulars that we worked out with instructions, patterns and a few tips that made things easier for us.
First off you need linen. Avoid the linen/cotton blends. And don’t even get me started on poly-no-sir! 100% linen is the fabric of choice for all pieces for the altar. We like Elizabeth Morgan’s linen from Church Linens. It is very smooth with minimal ‘slubs’ (the occasional irregular thicknesses to some of the threads where strands of flax fibers are attached to each other). Elizabeth’s linen is 4.4 oz per square yard and 144 threads per inch.
Our finished purificator measures 18" long and 11 1/2 " wide. The ends have a 3/4" hem and the sides have a 1/4" hem. This size will work well on most chalices. If your priest uses one significantly larger or smaller than average you’ll need to adjust the size of your purificator accordingly. The cut size for the linen is 21" x 12 1/2".

So, let’s get this straight. In order for the finished purificator to be straight the cuts need to be exactly on grain. The best way to make that happen is to pull a thread and use that line to guide your cut. And here’s a neat trick that the lovely Elizabeth Morgan taught us; it isn’t necessary to completely remove the thread as long as you disturb the grain enough to see the line. Make a small snip into the linen at your cut line. From one of these edges pick loose a single thread running across the fabric using a straight pin to tease one loose if needed. Gently pull an inch or so gathering the linen and then smooth the resulting wrinkles out toward the other side of the fabric. Continue in this way until that thread is ‘disturbed’ all the way across. You will probably break the thread a few times as you go. That is normal. Cut your fabric along the visible line until you get to the end of that thread disturbance. Pick out another thread and continue on from that point. The pulled thread line is more easily seen if you cast a beam of light along it at a low angle. I usually turn on the flashlight on my cell phone and lean it against something so it shines down my drawn thread. Cut off any selvage edges that you encounter. You might be tempted to use them since they won’t unravel, but they tend to pucker and shrink more than the rest of the linen as it is laundered. There is usually a faint but visible line on the selvage to use as a cutting guide.
New linen is smooth and crisp. It takes folds well. As it is repeatedly laundered it softens up beautifully. Our first purificators were made from a piece of antique linen that Fr. P gave to us. It was incredibly soft, and supple. Still, it took a fold really well. This is one of the properties that will help you differentiate between a piece of linen and a piece of cotton.
And, as long as we’re talking about folding linen, you should meet Joan Sallas from Barcelona.
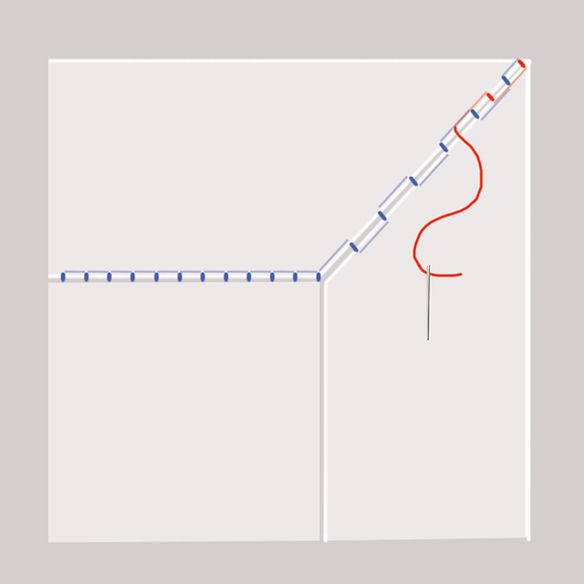
Linen does have an almost paper feel to it in the way it takes a crease. This comes in really handy during the hemming process. Using a straight edge and a bone folder or non-serrated butter knife, gently but firmly crease the linen along the fold lines 1/4", 1/2" and 3/4" on each long side and 3/4" , 1 1/2" and 2 1/4" on each end (the extra third fold lines help to determine where the corner folds go to create the miters). A clear quilting ruler is great for this.
Here is a very helpful diagram of the mitered corners. This uneven hem (short on the sides and deeper on the ends) is a bit tricky to pull off, but it has such a nice balance and look to it that it is worth doing. You might want to do a trial run with a piece of paper first. It will demystify the process significantly.

After you get your folds set and your corners trimmed and folded, pin and then baste the hem all the way around. Then carefully hand stitch the hem using the convent stitch shown in the PDF file and in a video below. We prefer this method because it almost eliminates visible stitches on both sides of the fabric. You should shoot for eight or nine stitches per inch.


We use a double thread when we stitch purificators. We have had to re-hem so many of our vintage ones because they get laundered and ironed so frequently, and they don't lie quietly on an altar like a corporal, but play a much more active role at every Mass. The threads just give out. A double thread will help to mitigate that. Also, wax your thread to reduce the knotting. It can make your stitches look a little gray initially, but don’t worry, it washes right out. Use a very fine needle, like a size 10 or 12 sharp, especially if you are using a tightly woven linen. Clover's Black and Gold needles are nice as well as Bohin's size 11 applique needles. Look at Rory Duffy’s video on getting used to using a thimble. You’ll appreciate that skill when you sew with these very fine needles. They are extremely sharp on both ends and can trash your middle finger if it’s not tucked safely inside a thimble.
Here is a great way to zip up and down those mitered corners in an elegantly efficient way. Just double the space between stitches and fill in the betweens on the way back down.
This video covers the Convent Stitch, waxing thread, beginning and ending a thread and the elegant method of stitching a mitered corner.
Now we need to add lace. Tatted lace is perfect for this because it is firm and holds its shape really well. It also isn’t too frilly. Here’s a good set of helpful beginner videos that will teach you how to make tatted lace.

We settled on two particular patterns because we liked the Trinity picots at the top of each ring, and the simpleness of the designs suited purificators well.
Abbreviations used for stitches in these patterns:
ds: double stitch
p: picot
R: ring
Ch: chain
Here are the patterns.

Tatted Trinity Rings:
This pattern is knotted using a single, full shuttle.
5 ds, p, 3 ds, p,p,p, 3 ds, p, 5 ds, close. Leave 1/4" thread and work next ring joining the first picot made to the last one of the previous ring. Repeat to desired length.

Tatted Trinity Rings and Chains:
This pattern is knotted with a full shuttle, leaving the ball of tatting thread attached.
R: 5 ds, p, 3 ds, p, p, p, 3 ds, p, 5 ds, close. reverse work
Ch: 3 ds, p, 3 ds. reverse work
R: as above, joining first picot to the last one of the previous ring.
repeat to desired length, ending with a ring.
Alternatively to begin and end the lace you could start with half of the chain,
Half Ch 3 ds. Reverse work. Ring...
This places a half chain at the beginning and end so that the tail of the thread can be inserted into the linen at the bottom of the lace rather than having a thread coming down from the ring base.
Threads in the pictures are 40 (the thickest weight), 60 and 80 (the thinnest weight).
I really like using Dual Duty Button and Carpet thread for beginning. It is a good weight, resists snapping during the learning process and has a smooth finish to help with the sliding part of making rings. After you get the hang of it switch to DMC’s Cordonnet Crochet Cotton in size 50 (thickest), 60, 70 or 80 (almost too fine and fragile). This thread is preferred because it is a cleaner white and doesn’t have the slightly plasticy look of the Dual Duty.
Tatting shuttles can be found at most fabric stores or through Lacis. Etsy also has several vendors who make great tatting shuttles. When the lace is finished simply hand sew it to the short ends of the purificator. Leave a couple of inches of the cordonnet cotton at the beginning and end of the lace that can be slipped into the hem to create a tidy finish at each end.

And lastly, we have sorted out the process of stitching a reversible red cross for the center, because we want our purificators to look beautiful on both sides.

On Elizabeth Morgan’s Linen the x’s in our crosses are stitched over three threads. Yes, you will need a magnifier – a really good one, at least 3x magnification. I have found that this clip-on magnifier works really well and has the advantage of being portable (I stitch lots of these in waiting rooms and waiting for the train). I don’t use an embroidery hoop for these crosses.
Before stitching I like to check the weave on the linen. If either the warp or weft threads are tight on your linen the cross can come out rectangular instead of square. Not cool. Poke a pin through the linen to create a visible square six threads tall and six threads wide. If it looks like a nice square you’re good to go. If it’s an obvious rectangle you can add a thread to one or two of the x’s to even out the arms of the cross.
Here is how to deal with the beginning and ending threads of the embroidered cross. No knots are needed. I start the cross in the center leaving a short 1/4" tail and inserting the needle from the front side so I can keep an eye on that tail. Before you create the first three x’s along the first arm of the cross bend the tail thread up so you can cross over it to secure it in place. If there is any left over thread, snip it off flush after the third x. Continue through both rounds of the cross which should leave you back in the center. Insert your needle under the first three x’s of the nearest arm of the cross and pull the thread through to secure it under those stitches. Snip close to the third x.

And that is the whole of it. It is not a quick project by any means, but it only feels crazy if you set aside the important spirituality of creating this special piece for the Mass. As in all things done in the Saint Martha’s Guild our desire is to make the work an offering – an offering of love to Jesus, an offering in reparation for the gross offenses against the Mass, an offering for the conversion of sinners, and an offering for the priest who will use this at the altar. Having a finished purificator at the end is a bonus!