Design Elements


Restoring the Art of Liturgical Needlecrafts
Apostolate of the Canons regular of St. John Cantius
Repairing Torn Lace on Netting or Tulle

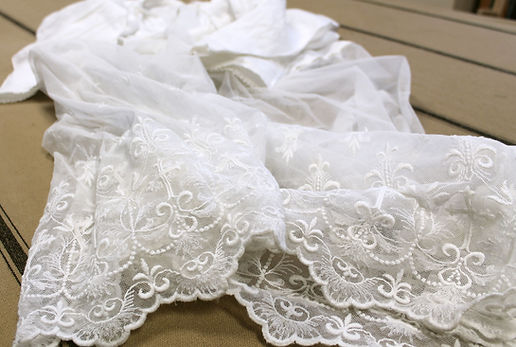
I had a lovely session with Fr. David’s lace alb today. It smelled like incense which added a pleasant bonus of aroma therapy to the project. The alb is elegantly detailed linen with a lace skirt of scalloped crosses and fleur de lis on English cotton bobbinet tulle. It is particularly nice.
Particularly nice except for that rip in the front, courtesy of a shoe in the wrong place. It happens all the time. Stairs and ankle length garments don’t always play nice together.

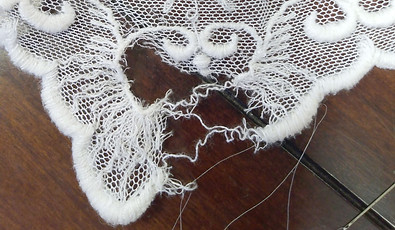
Step one in the repair process is to carefully assess the damage. For a tear like this I have found that it is better to trim off the floppy, shreddy threads rather than trying to stitch them back together into something that looks tidy. Chopping it off feels like a bad thing to do but it makes for a much less visible repair and allows you to get a clearer picture of what needs to happen to rebuild the missing lace.

Study the repeat pattern on the healthy scallops of your lace. Are there important parts missing or askew that will need to be rebuilt during the repair? Take your time with this because if you close up the damaged area, but don’t replace missing netting or rebuild the lace pattern, you won't be happy with the results. Also, keep in mind that the force of a tear will often cause stretching and distortion of the ripped edges, so don’t assume that the way the torn edges lie has any relation to where things need to be to recreate the original pattern. You can see this in the bottom section of the tear where the scallop edge has stretched to nearly twice the width that it should be. Mashing and wiggling will need to happen to get things back to where they were.
In this repair you can see the big smiling gap that needs to close up, and that the bottom of the center dot should touch the lowest curve of the oval frame. That is what should be stitched first, giving the base structure needed to match the other patterns and to reveal the size and shapes of the patches.

Start a Lace Junkyard
Our lace junkyard did have a scrap of this cotton bobbinet (tulle) that worked nicely to fill in the gaps. Yes, we have a lacejunk yard. DO NOT throw away any pieces of lace. Lace gets holes in it All The Time. This pile of scraps is our equivalent of the black iron-on patches that we use on cassocks.
Last year a few ladies came for a three day ‘workshop’ and one project they brought with them was a torn lace alb. There was a pretty significant chunk missing. Serendipitously we had a matching lace scrap in our lace junkyard and were able to do a super easy mend to fix the problem.

The junkyard has taken over one of our flat file drawers and contains more than just scraps of lace. The supplies include:
• Several kinds of tulle, in white, and very light ivory because some of the older lace has aged to that color. Make sure the alb is clean before you start. You wouldn’t want someone to send the alb through Don’s miracle whitening treatment and have your ivory patch sitting there surrounded by snowy white lace. Types of tulle vary widely. It might be called Bobbinet or Netting. It can be cotton which is softer and has a nice drape. There is also 100% silk tulle, usually manufactured in England or France. The more common and less expensive tulles are polyester or nylon. I think there’s a rather unpleasant version that is plastic and used to wrap gift baskets. You probably won’t need any of that.
• Silk Organza. This stuff is so beautifully sheer that you can patch your heart out with minimal visibility, plus the fabric content is so classy. Singer makes a nice silk organza pressing cloth. It probably works fine as a pressing cloth. It is very sheer though, enough to make us nervous about clamping a hot iron down on one of those flat felled seams with this featherweight layer standing against iron shine. We have plans to test the boundaries of its heat tolerance, but in the meantime have stocked our lace repair drawer with a few of them.
• Polyester or nylon organza (more on that below)
• A few spools of extra fine thread.
• John James, Bohin, or, our favorite, Tulip #10 sharps. Fine needles can be very helpful, not so much for stitching through tulle, but because you will do quite a bit of stitching through dense sections of lace.
• A piece of black plexiglass to slip under the lace during repair especially if your work table is light colored. Be careful that you don’t snag the lace on the corners. We're thinking of giving ours a session with a router to curve all of the edges.
• A piece of dense styrofoam in case pinning is needed.
• Several weights of cotton string for repairs to crochet lace (That’s a whole different project).

• Not in the drawer but super helpful is a good light and magnifier. This one is a Dazor.
Thread
You might instinctively want to reach for a thread that matches the thickness of the tulle threads, but when you start whip stitching the patch in place that thread will stand out significantly.

My go to ‘thread’ for lace repairs is a weft thread (going across the fabric) from a scrap of organza. We source ours from a useful scrap trimmed from the basic lace all of our Canons wear. I have a nice channel going across the piece from teasing out my lace repairing threads. I’m not sure if this stuff is nylon or polyester, but the individual threads are slightly transparent, very thin, and surprisingly strong. I have tried the fabric store’s spool of transparent thread but it tends to be coily and stiff, both aspects making it super annoying to work with. Plus I instinctively balk at putting something that feels like fishing line into church lace.
As an interesting aside, in a very old church embroidery book I came across a chapter on lace repair. The instructions were, “Go to Grandma’s hairbrush and pull out a few of her long clear strands.” Huh. Interesting. Maybe a little icky. However, hair is suitably strong, nearly invisible, and behaves beautifully during the stitching process. It definitely has a non-friction direction, which you can feel by running it through your fingers. I have messed around with this ‘thread’ and they’re not wrong. In a pinch, it is a good option.

For either type of thread it is extremely helpful to tie it onto your needle with a couple of overhand knots. Otherwise you will be spending half of your mending time rethreading your needle.

An amusing property of this thread is that it can make you feel like you’re one of the shysters in the Emperor’s New Clothes fake stitching with thin air.
Stitching
It is likely that you will use three types of stitching; stitches applied to the trimmed edges to prevent any further unraveling, whip stitches to secure the patches, and decorative stitches, which will probably be made with regular thread, to recreate any missing sections of the pattern motifs that were lost in the accident.
Always work on the back to reconstruct the base and add patches, periodically checking the front for any stray threads that might need to be sewn down.

We don’t usually like knots, with their lumpy ugliness and little tail of thread sticking out the back end. This is especially true with lace which should look nice on both sides. Our standard solution to this is to insert the needle into a channel of the thicker lace pattern (as in the image above) about a half needle’s distance from the desired starting point, and bring it out where the first stitch needs to go. Pull the thread through just until the tail disappears into the lace. Pinch that spot to hold it securely and make a couple of small stitches to secure the edges where the damaged threads were removed. This both prevents fraying at that vulnerable spot, and ‘knots’ the thread so it won’t pull out.

To begin this particular repair I inserted the needle about a half inch to the left of the break in the oval shape, slid the needle down this channel to the end, made three or four small stitches to prevent further unraveling, reached across to snag the other side of the broken oval frame and snugged the two together also securing the frayed end on the right side. I went around this connection a few times to get it really stuck together properly. Then the frame was stitched to the bottom dot to sort out the structure. At that point I could finally see the shapes needed to fill in with tulle patches.
Patches
Two small patches were cut to fill in the blank areas. You don’t need to fold over the edges of the tulle patch, because it doesn’t really unravel. Just whip stitch it in place, trying to orient the lines in the tulle so they run parallel with the existing ground. Secure the ends of any of the thicker torn lace pattern sections when you come to them.

End your threads by taking two or three small stitches and then running your needle through some thicker lace pattern section and clipping the end flush, even if you have to take some unnecessary traveling stitches to get to a place where you can hide the tail of your thread.
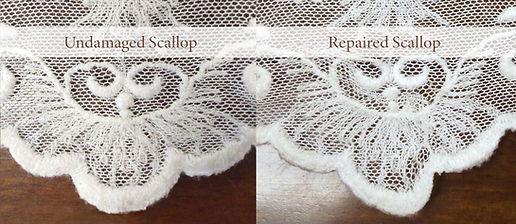
If you are in a super restoration mood, you could even completely clip out any half filled areas of tulle and cut patches that would lose their edges in the thicker lace pattern sections. That is my disappointment in this repair – that you can see a denser stripe through the tulle area in the oval shape. Maybe nobody will notice that from thirty feet away in church, looking at the back of Fr. David, but it feels important to produce work that received our best effort. That is always a balancing act in the sewing room.
There weren’t any embellishments needed to recreate missing pattern sections in this particular repair, but in hindsight, that bottom scallop looks a little shy to me and should have probably been spaced out a tad with some bridging stitches using thicker thread and then a wrap over the top to recreate the missing section.
One thing to keep track of is multiple tears from the same priest/alb combination. It may mean that the hem needs to be raised. If this is the case, the simple way to do it is to add a 'decorative' tuck or two at the bottom of the linen part of the alb running parallel to the lace attachment.
I find that this kind of work is very good on several levels. Gazing at lace for extended periods of time adds soul-healing beauty to the day, getting intimately familiar with each type of lace contributes important information to the growing store of knowledge, The religious who wears this garment gets some extra prayer, and there is the simple satisfaction of sending a wonderful item back to work in the liturgy.
