Design Elements


Restoring the Art of Liturgical Needlecrafts
Apostolate of the Canons regular of St. John Cantius
Laundering, Starching, Pressing & Pleating a Linen Altar Cloth
I have been rather surprised to find that there is almost no available information about caring for altar cloths. There are lots of sources for prepping purificators and corporals, but for altar cloths — just crickets.
This article specifically deals with linen altar cloths. If you have a choice on a new altar cloth, choose linen. The whole starching process is pretty intense when done old-school, which explains why people run for polyester, but nothing beats a crisp linen altar cloth. Linen is a very strong fabric, it releases stains much better than polyester, and the ‘wrinkle problem’ can be turned to your advantage. If you add to that the long history of the use of linen in the liturgy, copious mentions of it in scripture, the fact that our Savior’s shroud was fine linen, and the significant symbolism attached to this unique fabric it’s kind of hard to work up any enthusiasm for plastic alternatives.
It is helpful, as one embarks on this process of prepping a linen for the altar, to take a moment to think about what lies in front of you. The altar cloth acts as the base for the Holy Sacrifice of the Mass. You are carefully preparing a shroud for your beloved Savior. With that in mind the labor of its preparation should be offered with a touch of sober reverence and attention, never as just mundane laundry. Make it a beautiful and spiritual exercise and the undertaking will become a lovely interlude.
There is a lot of information here. It makes the process look much longer than it really is. The hope is that we can touch on all of the challenges that you might encounter so you can max out your box of tricks.
Altar cloths have a different set of issues than the other linens used in the Mass. They get stained by several sources, attacked by flaming wicks, and bombed with hot wax. Fancy chasubles saw away at the edges. Caring for them properly will require a plan to deal with each challenge.
First, a disclaimer. I personally don’t know very much about how to clean and starch altar cloths. Don does it. He is our chief sacristan, and has an amazing wealth of knowledge about everything related to the care, preparation and installation of altar linens and adornments. He is charged with dressing all of the altars on the campus of St. John Cantius (I believe there are thirteen of them). Plus he looks after just about anything remotely related to Catholic fabric items. He has always generously shared his tips and tricks with us, fine tuned over many years by trial and error. He has given me permission to pass this helpful information on to you.
The complete process includes stain treatments, laundering, pressing and pleating.
Cleaning the Altar Cloth
Stain treatments & laundering

Altar cloths can show up with all kinds of stains on them; wine, dust, soot, wax, and other various mystery stains.
Step 1 - Wax Removal
Wax and the accompanying soot is probably the toughest stain to sort out. Once you have had the wax fight you will understand why people put vesperales on their altars. Until you have one, this will be your first step in the process. Check the whole length for drippings and soot. They are difficult to remove without leaving a stain and need to be dealt with before other stain treatments and laundering. First remove as much of the wax as you can by gently flexing the fabric and scraping or brushing away any loose pieces. Sometimes freezing the linen or applying an ice cube will make the wax more brittle and easier to remove. The dull side of a butter knife is a good scraper if needed, but be gentle.

Do NOT use the iron to remove excess wax because heat is likely to set the stains.

Next, you'll likely need to address the oily stain and any soot that the wax left in the linen. Treat the area with wax remover meant for fabric following the directions on the bottle. EZ Task Wax Remover works well. Let it sit at least five minutes before laundering. Reapply wax remover just before placing the altar cloth into the washer.


If EZ Task wax remover does not work, try isopropyl alcohol. Choose the kind with the highest alcohol content; 99% if you can get it. Apply the rubbing alcohol to the spot and gently massage the linen between your hands. Wash immediately. Sooty wax stains sometimes respond to this, but not always. Don has also had success using Carbona Stain Wizard on sooty stains.

Step 2 (maybe) - Pre-soak
If an altar cloth has been on the altar for a long time and has a variety of stains, (both known and unknown), give it an overnight pre-soak.
Start with an extra large washing machine bag. The 43" x 35" is a good size and readily available. This will help to protect the altar cloth during pre-soaking and in the washing machine. It’s large enough to allow the linen to move freely, but contains it enough to keep it from getting into trouble during the crazy spin cycles. It also helps to manage the octopus-ness of a long altar cloth.
Dissolve one scoop of POWDERED Biz (Don’s go-to linen stain remover) in a laundry sink filled with water.
Do NOT place an altar cloth into hot water. It isn’t necessary to get it clean and can cause shrinkage.
Add the altar cloth zipped into the large washing machine bag. Let it soak overnight in this solution. It can be helpful to place gallon jugs filled with water on top of the altar cloth to keep it submerged in the soaking solution.
Do NOT use bleach on a linen altar cloth. It is very damaging to the fibers and will destroy the linen. We have seen much evidence of the use of bleach which has painfully shortened the life of some very beautiful altar cloths. Using Biz as a part of your normal cleaning routine will eliminate any need for bleach.

Alternative Step 2 - Pre-treat any stains
If the altar cloth only has a few minor stains, the overnight pre-soak may not be necessary, treat the stains with Don favorite Carbona stain treatments.
—UNKNOWN STAINS
The general Carbona Stain Wizard stain treatment will usually handle any unknown stains.
—WINE STAINS
The Carbona Stain Devils Coffee, Tea, Wine, and Juice is the best Don has found for removing wine stains. He says it always works. He soaks the wine stains in the product overnight and they always wash away the next day.


Step 3 - Wash
Wash the altar cloth in the washing machine on the delicate cycle. Use a scoop of Biz powder, and Woolite. Be sure the Biz is dissolved. If you have pre-soaked the altar cloth, drain off the soaking solution, and if there are any wax stains on the altar cloth, reapply EZ Wax Remover. Place it (inside the washing machine bag) into the full washer containing the dissolved Biz and Woolite. The water should be slightly warmer than room temperature and filled quite full so there is good water circulation around the altar cloth.
TIP: Bluing may be added to the wash water for a whiter appearance. Follow the directions on the bottle. Be careful with this though and be sure the bluing is dissolved and dispersed into water completely, and that no blue drops can be seen anywhere in the machine or blue dots may appear on the linen after washing is done.
Starching the Altar Cloth

A heavily starched altar cloth will help your hems to sit flat, the drops to hang well, wrinkles to disappear, and crisp accordion folds to hold their shape. It is well worth the effort needed to make this happen. Be sure to set aside enough time and attention for this process.
When the washing cycle finishes, prepare the altar cloth to go into the starch solution. If you do not have sufficient time to starch and press the altar cloth it can be rolled up in a damp towel and refrigerated overnight in a tightly sealed plastic bag. Ideally the starching should be done in a timely manner in order to achieve the best result.
Step 1 - Remove some Moisture
The linen needs to be damp, somewhere between wet and dry. If it is too dry it won’t accept the starch solution evenly. If it is too wet it won’t soak up enough of the starch solution to achieve a really crisp finish. If the altar cloth is fresh from the spin cycle at the end of the wash it will still be too wet. Remove the altar cloth from the washing machine bag and either hang it to air dry a little, monitoring it to allow only some moisture to evaporate, or set your dryer to the lowest heat or no-heat setting and toss in the altar cloth – two minutes for a small altar cloth, three or four minutes for a large one.

Step 2 - The Starch Dip
In a five-gallon bucket, mix Sta-Flo liquid starch and water prepared in 1:1 ratio. For a large altar cloth use two gallons of starch and two gallons of warm water. Starching can be a messy process. Put a couple of towels under your bucket to catch any splashing.

Stir up the solution before inserting the linen, or the starch will settle to the bottom and my leave uneven marks. Add the altar cloth to this solution. Lift the altar cloth up and down in the starch solution four or five times. If it is a long altar cloth, take one end in one hand and grab a second point along the fabric edge with the other hand to open it up, ensuring that all of the linen receives the starch evenly. Keep repositioning your hands along the length of the linen until the entire length has been dipped.

Set a large strainer on top of the bucket, drop the wet altar cloth into it and press to remove excess liquid. It’s best not to wring the altar cloth because the twisting puts too much stress on the stitching. You can store the leftover starch and water solution in a lidded bucket for at least a month. Adding a few ounces of vodka will extend the life even longer. Discard the solution when it shows signs of going bad.
Pressing the Altar Cloth

Step 1 - Remove some moisture
This will sound very similar to the prep for the starching process. It is best to iron linen when it is damp, not dripping wet. If the linen is too wet, ironing is difficult and a lot of starch solution will transfer to your ironing board or rotary iron. If the linen is too dry before ironing, you will not get a perfectly ironed cloth, even if you mist and mist and mist. After pressing out the wet altar cloth in the strainer, spin out even more starch solution by using the spin cycle of the washing machine. Be careful to not allow the washer to add water. At this point the altar cloth is probably still too wet for optimal ironing. Set your dryer to the lowest heat or no-heat setting and toss in the altar cloth for three or four minutes.
Step 2 - Iron
Before pressing the altar cloth always check your iron for any grime that might transfer to your linen. Don uses Faultless Hot Iron cleaner. We have also been quite happy with Dritz Hot Iron cleaner. You also may wish to purchase a dry iron which has no steam holes. Starch will build up on the iron over time. The iron cleaner gets into the steam holes and will likely cause problems when it transfers to your linen.
The iron should be on the linen temperature setting which is the hottest. Fill a spray bottle with water to mist the linen if an area begins to show signs of not ironing well, most likely from being too dry. This may be an indication that the altar cloth needs less time in the dryer, or perhaps the ironing was delayed after the linen was in the dryer. In addition to the problems with getting the linen to be beautifully flat, premature drying can cause visible streaks to form because the starch will settle unevenly if it is left sitting too long. It is very disappointing when this happens, because you will have to return to the beginning of the process. It is best to iron the altar cloth on the wrong side.
If you expect to regularly iron altar cloths you might wish to make an ironing table. Even a board that is as wide as your altar cloth and an arm’s width deep will make this task so much easier than a standard ironing board. Pad the board with two layers of cotton quilt batting and cover with smooth cotton or linen fabric, pulled around to the back side and secured with a staple gun. We have an additional layer of cotton that we can remove and wash as needed. Our table is 4’ x 8’ and made from 3/4” plywood.

Don uses a Miele rotary iron with steam function to prepare all of our altar cloths. It takes several passes to completely dry the linen.

I’m guessing that the Miele rotary iron is probably significantly slower than the one that Don encountered in the laundry room when he first arrived at St. John Cantius. The thing was a huge, deliciously frightening, 100-year-old cast iron beast. It was gas heated with flaming jets that were spaced down the length of the rotary arm. It was a nice long rotary arm too that would accommodate the full width of an altar cloth. It took an hour to heat up. The gas jets were a little unpredictable, sometimes casting a wavering orange glow into the room. It kind of looked like it would burn down the rectory which prompted them to replaced it with our much less interesting electric version. It was a very painful moment when Don later discovered that the manufacturer offered a gas-to-electric conversion.
TIP: If you are using a rotary iron, sometimes the linen will stick to the hood’s heating pad. A brown line or patch can result and spoil the appearance. Do not re-iron this spot. Do not rewash. Moisten a white terry cloth towel with cold water and wipe away the mess. The linen may now be too wet to run it through rotary iron. Place a WHITE paper towel over this area and continue ironing. You might need to repeat this to get the linen completely dry. Remove the paper towel for the final pass.
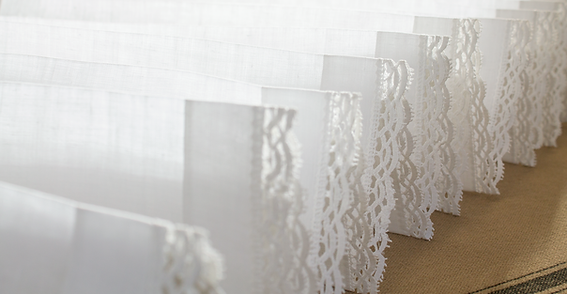
Pleating the Altar Cloth

A pleated altar cloth adds a very pleasing detail to the dressed altar. It also serves a very practical function, because it folds up into a nice tidy stack that can be easily stored in a sacristy drawer with all of the “wrinkles” happily behaving themselves. Folding it for storage any other way produces unhappy folds and undoes all of that nice ironing you just did. Undercloths can be loosely rolled, because the resulting curves are flattened out by the weight of the altar cloth on top. You can, of course, plan your ironing to go straight from the board to the altar. It is still a pretty sketchy maneuver though because linen is like paper and creases in odd places if you even look at it. We did make a 2 foot square ironing board that could be slipped under an altar cloth in situ to take care of small wrinkles.
To create the pleats, begin by ironing the altar cloth as described above. Then set up a comfortable pleating station by lowering your ironing board so you can sit in a chair. It doesn’t really take that terribly long, but sitting is nice. Perhaps queue up the St. Martha’s Guild Spotify playlist so you can pleat to Palestrina.
Place the bulk of the altar cloth face up on a long table or roll it very loosely, setting it on chairs or a table so that you can pull it forward for each set of pleats. Beginning at one end, lightly mist the linen with water, and turn up the first three to five inches to create an initial pleat. Finger press taking care to keep the fold as straight and on the grain as possible. Then set the crease with the iron. At this point flip the whole cloth over so you will be ironing on the back of the altar cloth. From here you will make two creases in each maneuver. Lift the front edge and fold it up over the linen to create the next fold carefully lining it up with the leading edge of the altar cloth and making sure it isn’t walking left or right on the ends. Then lift the front edges of the growing stack and fold under to create the second fold of this pair. Set these two creases with a spray of water and the iron. Repeat until you get to the other end. Keep a constant eye on the grain because the stack of the hems on each end tends to drag the middle section off of the straight grain. If you don’t correct for that you’ll end up with an unhappy smile-shaped final pleat. If you’re really classy, as you near the end you can begin to make slight adjustments in the size of the pleats to allow for a pleasing final pleat rather than having one that is overly large or too small.
If the altar cloth is only used for special feast days so that it will be stored for a long period you could wrap it in tissue or some kind of wrapping paper to protect it from dust. This is also the way to package it for transportation. If you have more than one altar, you may wish to add an iron-on label to indicate where the altar cloth hangs out.
And there you have it in a very full nutshell. Again, all of this stain removal, laundering, starching, pressing and pleating may look pretty intimidating but it's not actually that terribly difficult, or time consuming — and it is well worth the effort!
